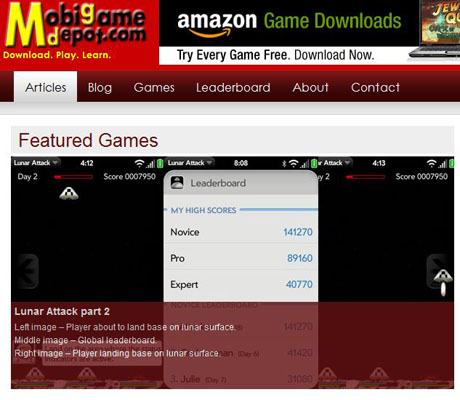
Mobigamedepot.com Opens

Sunday, January 17th, 2010

Regular readers of this blog may have noticed a reduction of posts here. The reason for this has been that I’ve been working on Palm WebOS games and a corresponding website mobigamedepot.com.

This new website will be the portal for the games that I will be developing and I will post some behind the scenes details about the development work here on Cochinoman for your reading pleasure.

For starters, why did I choose the Palm WebOS platform? When the iPhone first came out, I wanted to do development work for it but since I’m not a Mac user, there was that learning curve and the SDK was not available at first. Then before I realized, everybody and his brother was on the iPhone platform and it was too late to get in the game.

Fast forward 2 years and when the Palm WebOS was announced at CES last year, my interest was again peaked. I followed the SDK development closely and managed to get on the software developer program as an early developer.

The WebOS SDK has a lot of limitations, especially for real-time games, but it also makes it less likely that the big boys will be getting on this path. As it turns out, there is a new PDK that was announced at this year’s CES that allows for low level C/C++ coding and the big boys (e.g. EA) has come out with their 3D games for the WebOS.

This last move still doesn’t deter me from working on my games because the big budget EA games will have to sell for $7-$10 and I will target the below $2 market for my games. There’s no way that EA could sell their games for 99 cents and still make money because of their overhead in developing these heavy games.

My first released game is “Lunar Attack,” which is basically an upgraded “Missile Command” with more features. In the future, I will post about the decisions that were made regarding this first game.  The second game I am working on is a scrolling sprite based game that takes place in a Pyramid.

If you are thinking about developing games on any mobile platform, you may find the articles interesting.  Even if you are thinking about non-game development on a mobile device, you might find something interesting in there.

Splashscreen WordPress plugin version 0.30

Friday, December 4th, 2009

Since the last release of my WordPress plugin Splashscreen version 0.20, there’s been many requests for new features. You may also want to read the original post for version 0.10 for completeness.  One of the most requested feature was to allow search engine bots to get the blog content so they can traverse the website properly.

Ask and ye shall receive… version 0.30 of the plugin, that is.

To control the new feature, I’ve added some new options in the settings as shown below:

splashscreen1

Click on image for large version

Enable Overlay:
When this option is enabled, the splash screen will be an overlay on top of the content of your blog page. In other words, your blog will still be there, but the splash screen will be on top of your page. This way, the search engine bot can still “see” your blog, even though your visitors cannot while the splash screen covers the contents.

If you turn this option off, you will get the non-overlay version of the splash screen which will NOT have your blog contents “under” the splash screen.  I kept this feature in the plugin for backward compatibility for people who are using it right now.

Overlay Opaque:
The new overlay splash screen is made up of a background and a dialog-type box with links, as shown below.

splashscreen2

Click on image for large version

Normally, you would want the background to be opaque (cannot see-through) so this option should be enabled. However, for some bloggers, you may want to have the background transparent so that you can see a little of what is on your blog. Of course, this would not be a good idea for “adult” websites, but for people using this plugin for non-adult websites and wanting to force the users to agree to your “terms of service,” you might want to tease them with a preview of your blog.

Overlay Background Color:
This is the color of the background using normal CSS specifications (e.g. #000000, rgb(0,0,0), black). If you don’t know what CSS colors are, see this article.
The rest of the options are the same as in version 0.20. However, if you are using the new “overlay” feature, you must use a new template. The default overlay template is called “splash-overlay.htm” as shown below:


<script type='text/javascript'>
function setsplash() {
   setCookie("splash", "1", "", "/");
}
</script>

<div style="left: 50%; top: 50%; position: relative; background-color: #F5F5F5; margin-top: -150px; margin-left: -300px;
 width: 600px; height: 300px; padding: 30px;">
 <center>
    <table border="0">
       <tr>
          <td colspan="2" align="center">
             <img src="<?php echo plugins_url('splashscreen/images/wordpress-logo.png'); ?>">
          </td>
       </tr>
   <tr>
      <td colspan="2" align="center">
         <script type="text/javascript">checkcookies();</SCRIPT>
            <h3>
               To enter this website, you must agree to the terms below.
            </h3>
         </td>
      </tr>
   <tr>
      <td colspan="2" width=100%>
         <FORM>
            <P><TEXTAREA style="font-size: 14px;" NAME="comments" COLS="70" ROWS="7" READONLY>By
 using this website, you agree to the Terms of Service below. This Terms of Service is a binding contract
between you and this website. If you do not agree with any of these terms, please exit this website.

TERMS OF SERVICE:
[enter terms of service here]
With more text here, there will be a scroll bar on the right to allow the user to scrool to read the terms of service.

If he/she does not wish to read the entire contents, they may simply agree without reading. Even if they do
 so, they are agreeing to the terms of service by clicking on "Agree".</TEXTAREA><br />
            </td>
         </tr>
         <tr>
            <td align="left"><h2><a onclick="setsplash();showcontent();return false;" href="#"><font color="green"><b>I Agree</b></font></a></h2></td>
            <td align="right"><h2><a href="http://google.com/"><font color="red"><b>I Do Not Agre</b></font></a></h2></td>
         </tr>
      </table>
   </center>
</div>

Changing the template:
Be very careful about what you change in the template. My recommendation is to copy it to a new filename (e.g. mytemplate.htm) then start editing it. Do NOT change the original template because if you break it, you may not be able to get back to a working version.

  • The first item of interest in the template is near the top and is highlighted in green. If your website re-directs www.mywebsite.com to mywebsite.com, you will want to change the line to:
  • setCookie("splash", "1", "", "/", ".yourdomainname.com");

    Notice that you must have the dot (“.”) before your domain name.

  • Next, the blue  highlighted item is the WordPress logo that appears in the overlay dialog box.  You can replace it with your own logo and enter the name there. Place your logo file inside the subdirectory “images” inside the splashscreen directory. If you don’t want any image, remove the entire “img” HTML.
  • Finally, replace the yellow highlighted area with your own terms of service or whatever you want to display in the dialog box.

That’s it.

If you want to get fancy, you could change the size and look of the dialog box itself. This is left as an exercise for the student. One thing to keep in mind is that you need to center the dialog box properly.

Free Cool Feature:
While working on the new version of this plugin, I realized that if the underlining website is vertically long, the user could scroll down the page and not be able to see the dialog box. This can also happen if the URL is using a bookmark down the page (e.g. pointing to a comment near the bottom of the page).  At first, I tried forcing the page to automatically scroll up to the top. After a lot of work, I got this to work but when the overlay goes away, you are looking at the top of the page instead of what you wanted to see.

The solution was to copy the technique that terrible SPAM boxes use to follow you when you scroll. Basically, when you scroll, the javascript code will automatically move the dialog box so that it’s ALWAYS centered on the screen.  This also works for bookmarks in the URL.  Nice feature if I do say so myself.

You can see the new version of the plugin in action at alexisbreeze.com. This website is “adult” so don’t say I didn’t warn you.

Until I get this up on the WordPress plugin page, you can get it here.


Update December 5, 2009:
I took some code out of the template and created version 0.31. This should make modification of the template a little easier.

Update July 12, 2010:
A helpful commenter told me that the templates were missing a closing /FORM, which have been added in version 0.40.

Update August 24, 2010:
Yet another commenter has found that the adult template was not updated for this new version. This has been corrected in version 0.41.

PHP strtotime bug workaround

Saturday, September 12th, 2009

If you’re not into coding in PHP, skip this post and read the next one.

A few months ago, I was working on some PHP code and found a bug in the strtotime function in PHP version 4.3.11. It’s been fixed in version 5.2.0 but I’ve created a workaround fix for people using the older version of PHP.

Strtotime is a function that converts strings into time. The strange bug shows up when subtracting 2 from Sunday, which should give you the date of 2 Sunday’s prior to the original date.

The code below shows the same code running on both versions:

$datefmt = 'n/j/Y';
echo 'Current PHP version: ' . phpversion()."";
$offset = time();
echo "today=".date($datefmt, $offset)."<br />";
$s = strtotime("-2 Sunday", $offset);
echo "-2 sunday timestamp=".$s."<br />";

$d = date($datefmt, $s);
echo "-2 Sunday=".$d."<br />";

$sunday = strtotime("last Sunday", $offset);
$lastsunday = mktime(0, 0, 0, date("m", $sunday), date("d", $sunday)-7,   date("Y", $sunday));
$d = date($datefmt, $lastsunday);
echo "fixed -2 sunday=".$d."<br />";

The output from the code above is shown below when using PHP 5.2.0:

Current PHP version: 5.2.0
today=4/14/2009
-2 sunday timestamp=1238914800
-2 Sunday=4/5/2009
fixed -2 sunday=4/5/2009

The output from the code above is shown below when using PHP 4.3.11:

Current PHP version: 4.3.11
today=4/14/2009
-2 sunday timestamp=-1
-2 Sunday=12/31/1969
fixed -2 sunday=4/5/2009

The error is shown in yellow highlight. You can see that the error starts with the timestamp being “-1″ in the older version. Hope that helps somebody out there.