As you may already know, I’ve been slowly trying to move from Windows XP to Vista and have been encountering some differences. One big difference is that Vista no longer supports the old XP Web Publishing Wizard. In case you don’t know what that is, it’s a Wizard that helps you upload pictures onto a website without having to use FTP. It’s very useful if you have a picture gallery on your website.
Well, it turns out that Vista still has this feature, but it’s hidden.
On one of my websites, I use Coppermine Photo Gallery for the picture gallery. The application creates a .REG file that you can use to modify your registry to automatically setup to use the XP Web Publishing Wizard. The name of the file it creates will be something like “cpg_1157950751.reg” or with some other random numbers. Inside this file, you will find a line as shown below:
[HKEY_CURRENT_USER\Software\Microsoft\Windows\ CurrentVersion\Explorer\PublishingWizard\
PublishingWizard\Providers\websitename]
Now, replace the second “PublishingWizard” with “InternetPhotoPrinting,” as shown below.
[HKEY_CURRENT_USER\Software\Microsoft\Windows\ CurrentVersion\Explorer\PublishingWizard\

InternetPhotoPrinting\Providers\websitename]
Now, double click on the .REG file to execute it. The Registry Editor (REGEDIT.EXE) will execute your .REG file and create entries that will allow you to upload images to your website. You will get a warning window first telling you that you are about to modify your registry. After you click “OK,” you will get a confirmation window telling you that the entry was created.
Next, open “Windows Photo Gallery” from the Start menu. If you can’t find it, type in “Photo Gallery” in the search box at the bottom and it will most likely be the first item at the top.
Launch it, and use the program to find the photos that you want to upload to your website. Highlight the photos that you want to upload.
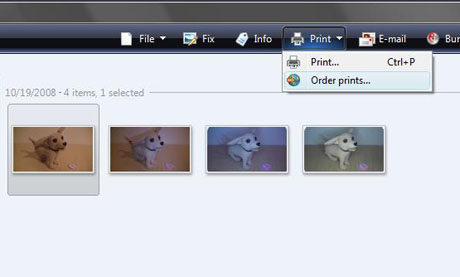
Now, click on “Print” from the upper menu area as shown below. Next, click on “Order prints…” as shown.

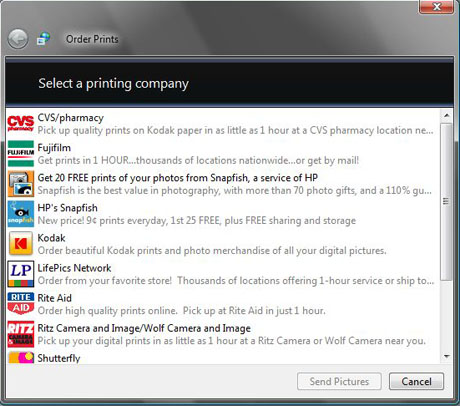
Next, you will get a window to order prints, as shown below. Scroll down to the entry that was just created for your website. Click on it and a window will open with the application running on your website.

Once you have executed your upload, the next time you run Windows Photo Gallery, your website will be listed in the pull-down menu from “Print,” so that you don’t have to look through the long list of printing companies any longer.
Also, if I remember correctly, in the XP version, there was an option to resize the images before uploading. Unfortunately, the Vista version does not seem to have this option. This means that you will have to manually resize the images before you do your uploading. It’s an extra step but it’s still easier than having to do everything manually via FTP.
It’s good to know that Microsoft decided to take out one of the truely great features of XP in Vista. No wonder these guys are doing so well. Love your Vista TV ads too, Microsoft. Keep up the good work.
 Cochinoman tech, sushi, poker


my head hurts now..it took me a long time to find vista web publishing wizard and it turns out to be lacking the resize option, now it will be so troublesome to resize the photos one by one before uploading..ugh..(@.@)
Ugh is right. Thanks you for nothing Microsoft!
Random question: I know you are using wordpress for this blog, but have you tried any other platforms. I am trying to decide for my blog? and I ask because I like yours.
I did look at most (if not all) the other options. I decided on WordPress because of the support you get on their website from other users as well as the large (and free) theme and plugin libraries.
If you find something better, please be sure to let me know.