Once you’ve explored your Playstation 3, one of the next things you’ll want to do is play music from your computer on your HDTV via the PS3. To do so, you’ll need to use Windows Media Player 11. If you don’t have that version, you’ll have to upgrade from Microsoft’s website.
If you are using Windows XP Media Center 2004 or earlier, you will not be able to upgrade your Media Player without upgrading your Media Center to 2005. There is no easy way to upgrade (paid or free) without installing a new version of Windows XP from what I can figure out. This is the problem people with Netflix accounts are having.
But I digress.
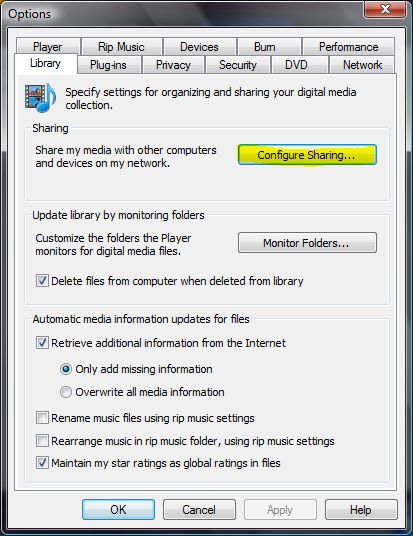
Once you have Media Player 11, go to “Tools”, then “Options” to open the window shown below. If you don’t see the menus at the top, right-click in the area with “Now Playing” listed, then click on “Show Classic Menus.” Optionally, you can just right-click that area, click on “Tools”, then “Options” directly from the right-click menu.

Windows Media Player 11 options window
First, click on the “Library” tab. Next, click on “Configure Sharing…” as shown above.
Next, you will get the window shown below.

Now, turn on “Share my media to:”, then click on the “Unknown Device” as shown above. The PS3 comes up as this unknown device. You’d think the PS3 would come up as “PS3” or at least “Sony.” Now, click on “Allow”, then “OK”, then “OK” on the previous window to close the options.
Now, go back to your PS3 and you’ll see a new icon that says, “Windows Media Player 11” under the music section.
You’re done! Enjoy.
 Cochinoman tech, sushi, poker


One comment
Pingback: Cochinoman » Blog Archive » PS3 downloads not compatible with media server